Rustic Poinsettia Petals Card - Free Tutorial
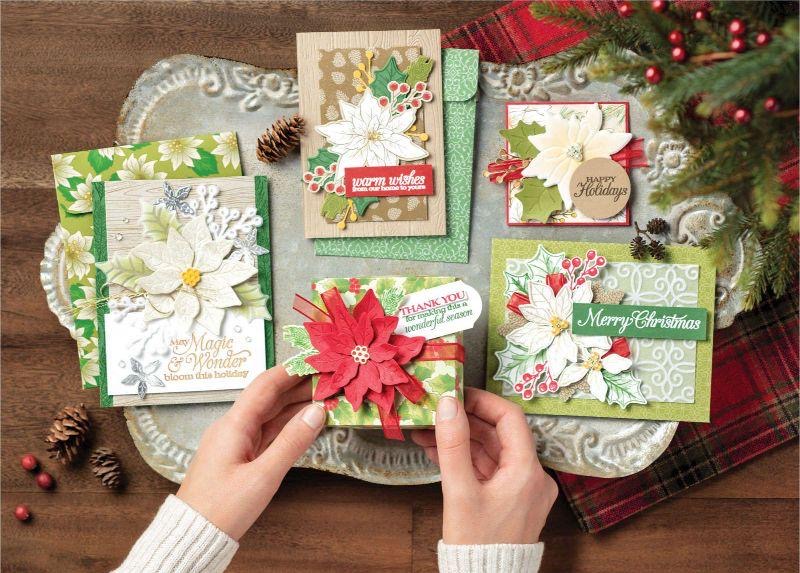
When you are looking to create traditional and elegant Christmas cards, the Poinsettia Place Suite is one you will reach for year after year.
Special touches like the flocked vellum in the Plush Poinsettia Specialty Paper (#153486), the dazzling Beaded Pearls (#153534), and the elegant Real Red Sheer Ribbon (#153535) make this suite stand out and shine. I also love that the Poinsettia Dies (#153522) have duplicates of several dies. That means when you stamp the layering poinsettia and leaf images from the coordinating Poinsettia Petals stamp set (#153475), you can save time by cutting out two of each at one time. We all love to save time!
From traditional colours to modern, monochrome elegance you'll be amazed at all the different styles you can create with this suite.
Below, I'm sharing a tutorial that combines a bit of rustic charm with elegant gold and embossed accents. I can't wait to see what you'll create with this gorgeous suite!
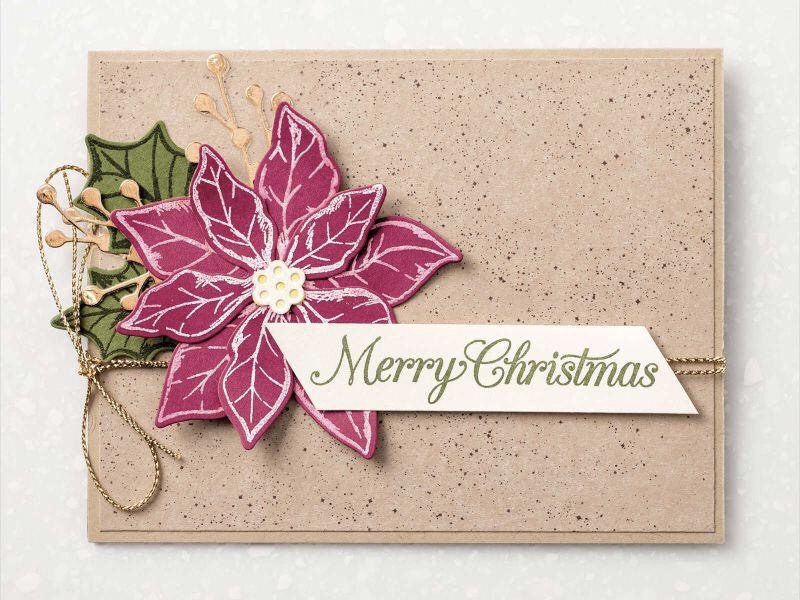
Poinsettia Petals Rustic Heat Embossed Card
INSTRUCTIONS:
1) Cut Crumb Cake cardstock to 5-1/2" x 8-1/2". Score at 4-1/4" along the 8-1/2" side. Fold and burnish on the score line.
2) Cut the splattered pattern of Gilded Autumn Specialty Designer Series Paper to 5-1/4" x 4". Adhere to card front.
3) Wrap card front twice with Gold Cord from the Wonder of the Seasons Ribbon Combo Pack and tie a bow at the left edge.
4) Stamp one of each leaf images on scrap Mossy Meadow cardstock with VersaMark ink. Cover generously with Clear Stampin' Emboss Powder. Tap off excess powder and heat emboss with the Heat tool.
5) Stamp one of each of the large and medium 5-point poinsettia images on scrap Merry Merlot cardstock with VersaMark ink. Cover generously with White Stampin' Emboss Powder. Tap off excess powder and heat emboss with the Heat tool.
6) Die cut the stamped images with the coordinating dies.
7) Die cut two of the delicate berry branch images from the Gold Brushed Metallic 12" x 12" Cardstock.
8) Die cut one each of the two small flower center pieces, one solid and one with holes fro the Gold Brushed Metallic Cardstock.
9) Layer the leaves, then the berry branches onto the left side of the card front with Glue Dots or Stampin' SEAL.
10) Layer the poinsettia flowers partly over the leaves using Stampin' Dimensionals.
11) Add the flower centers layered with Glue Dots or Stampin' SEAL.
12) Stamp the "Merry Christmas" greeting onto the center of a 5" x 3/4" piece of Very Vanilla cardstock. Cut ends at an angle with Paper Snips. Add to card front with Stampin' Dimensionals.
SUPPLIES:
BUNDLES: Poinsettia Petals Bundle (#155148)
PAPER:
Very Vanilla (#101650), Crumb Cake (#120953), Mossy Meadow (#133676), Merry Merlot (#146979), Gilded Autumn Specialty Designer Series Paper (#153520), Brushed Metallic Cardstock (#153524)
INK: VersaMark Pad (#102283), Mossy Meadow (#147111)
TOOLS: Heat Tool (#129053), Paper Snips (#103579)
ADHESIVE: Stampin’ Dimensionals (#104430), Stampin' SEAL (#152813), Glue Dots (#103683)
EMBELLISHMENTS: Stampin’ Emboss Powder Clear (#109130), Stampin’ Emboss Powder White (#109132), Wonder Of The Season Ribbon Combo Pack (#153537)
TIPS: Use the Scoring Tip of Take Your Pick Tool (#144107) to hold cardstock in place when heat embossing to avoid burning your fingers or smudging the image.
In case you need any of the above supplies, please support my small business by shopping in my ONLINE STORE - THANK YOU!
TAKE ME BACK TO THE TOP
Current Host Code
CLICK TO SHOP WITH HC

Free Newsletter!

Paper Pumpkin
SIGN ME UP!

Share With Friends
Most Recent Blog Posts
- FREE SHIPPING - DEC 14
- FREE SHIPPING from Oct 9th to 11th
- Stamp another Stack of Christmas Cards with Kevin & Christine
- Let the fun begin - again …
- Why wait? Join us now!
- Fitting Florets for any Occasion
- Festive Window Wishes
- Starter Kit + = No brainer!
- Perched in a Tree
- Awash in Beauty, so gorgeous!

.jpg)
.jpg)
.jpg)
.jpg)
.jpg)
.jpg)
.jpg)
.jpg)
.jpg)
.jpg)
.jpg)
.jpg)
.jpg)
.jpg)
.jpg)
.jpg)
.jpg)
.jpg)
.jpg)
.jpg)
.jpg)
.jpg)
.jpg)
.jpg)
.jpg)
.jpg)
.jpg)
.jpg)
.jpg)
.jpg)
.jpg)
.jpg)
.jpg)
.jpg)
.jpg)
.jpg)
.jpg)
.jpg)
.jpg)
.jpg)
.jpg)
.jpg)
.jpg)
.jpg)
.jpg)
.jpg)
.jpg)
.jpg)
.jpg)
.jpg)
.jpg)
.jpg)
.jpg)
.jpg)
.jpg)
.jpg)
.jpg)
.jpg)
.jpg)
.jpg)
.jpg)
.jpg)
.jpg)
.jpg)
.jpg)
.jpg)
.jpg)
.jpg)
.jpg)
.jpg)
.jpg)
.jpg)
.jpg)
.jpg)
.jpg)
.jpg)
.jpg)
.jpg)
.jpg)
.jpg)
.jpg)
.jpg)
.jpg)
.jpg)
.jpg)
.jpg)
.jpg)
.jpg)
.jpg)
.jpg)
.jpg)
.jpg)
.jpg)
.jpg)
.jpg)
.jpg)
.jpg)
.jpg)
.jpg)
.jpg)
.jpg)
.jpg)
.jpg)
.jpg)
.jpg)
.jpg)
.jpg)
.jpg)
.jpg)
.jpg)
.jpg)
.jpg)
.jpg)
.jpg)
.jpg)
.jpg)
.jpg)
.jpg)
.jpg)
.jpg)
.jpg)
.jpg)
.jpg)
.jpg)
.jpg)
.jpg)
.jpg)
.jpg)
.jpg)
.jpg)
.jpg)
.jpg)
.jpg)
.jpg)
.jpg)
.jpg)
.jpg)
.jpg)
.jpg)
.jpg)
.jpg)
.jpg)
.jpg)
.jpg)
.jpg)
.jpg)
.jpg)
.jpg)
.jpg)
.jpg)
.jpg)
.jpg)
.jpg)
.jpg)
.jpg)
.jpg)
.jpg)
.jpg)
.jpg)
.jpg)
.jpg)
.jpg)
.jpg)
.jpg)
.jpg)
.jpg)
.jpg)
.jpg)
.jpg)
.jpg)
.jpg)
.jpg)
.jpg)
.jpg)
.jpg)
.jpg)
.jpg)
.jpg)
.jpg)
.jpg)
.jpg)
.jpg)
.jpg)
.jpg)
.jpg)
.jpg)
.jpg)
.jpg)
.jpg)
.jpg)
.jpg)
.jpg)
.jpg)
.jpg)
.jpg)
.jpg)
.jpg)
.jpg)
.jpg)
.jpg)
.jpg)
.jpg)
.jpg)
.jpg)
.jpg)
.jpg)
.jpg)