 Hi, I'm Christine Alward and welcome to my website. I have been a demonstrator with Stampin' Up! since December 2009, and I love paper crafting and card making.
 I love to make people feel good and happy about their accomplishments, big or small, and I can never get enough of the smiles and pride I see on my customers' faces when they look at a finished project.
So many have told me that they have no creativity or talent when it comes to crafting, and all I would ask them is to give it a try and let me prove them wrong. Watching happy clients of all ages leave my classes with their finished cards and projects is what I like best about my job as independent Stampin' Up! demonstrator. I hope you will find inspiration in the projects I present here and that you will join me in my studio for a class.

Gorgeous Posies Card with a Twist - Free Tutorial
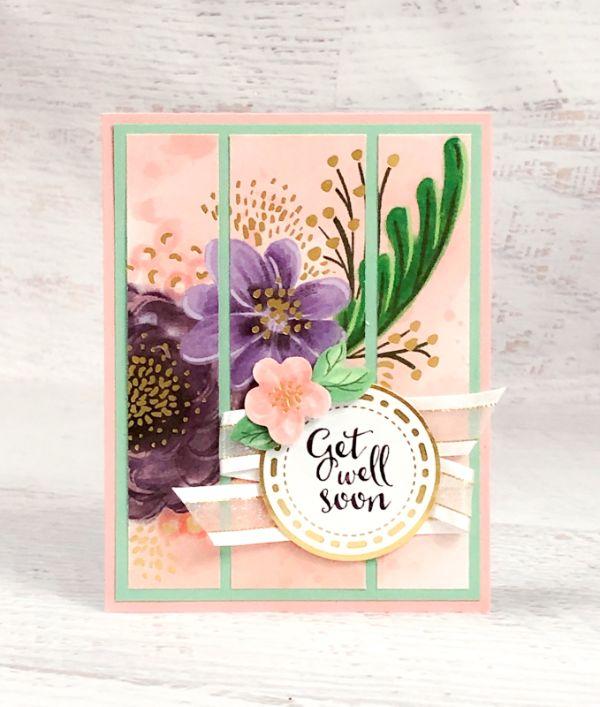
I am a big fan of kits! They offer a lot of bang for the buck and they make it simple to create awesome cards.
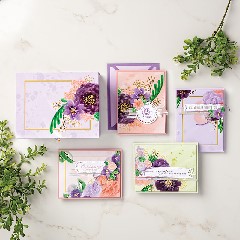
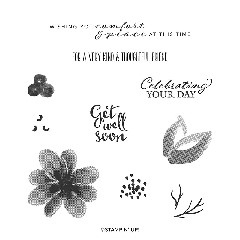
The Gorgeous Posies Project Kit includes the supplies for 16 cards (4 each of 4 designs) and a sturdy storage box that is great for gifting. You can add the coordinating Gorgeous Posies stamp set for more design options or use greetings you already have.
Many stampers make the cards just exactly as they are designed and some stampers like to tweak the designs a bit by adding extra layers or additional embellishments.
For this tutorial I will show you how to step-up the design by adding cardstock and foil layers and creating panels.
Let's go create something beautiful!
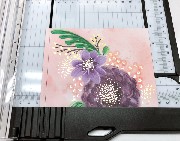 1. Trim
Trim 1/4" off of the top edges of the printed card layer so it is 5" tall.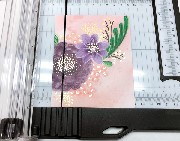 2. Rotate and Trim
Rotate the printed card layer and trim 1/2" off the edge with the large Blackberry Bliss flower so the layer is 3-1/2" wide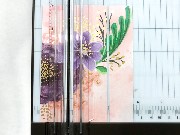 3. Cut Strips
Place the card layer on the paper trimmer with the 5" side parallel to the cutting track and the 3-1/2" side along the bottom or top ruler. Cut 1" off the left and right edges. The centre section will be 1-1/2" wide. Keep strips in order so the image stays correct.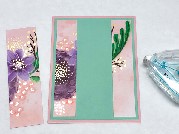 4. Layer Strips
Cut Mint Macaron cardstock to 4" x 5-1/4". Adhere to Blushing Bride card base. Adhere the two outside 1" strips to the Mint Macaron layer so they are 1/8" from the top, bottom and sides.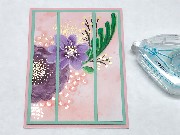 5. Add Centre Strip
Center the middle strip and adhere in place.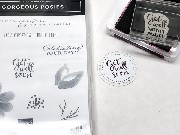 6. Stamp Greeting
Stamp Greeting from Gorgeous Posies stamp set with Blackberry ink onto circle laser-cut tag.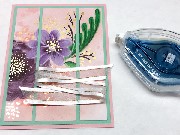 7. Ribbon
Add a line of SEAL+ vertically on the card to hold the zig-zag of ribbon. Lay the left end of a 10" piece of ribbon near the bottom from left to right. Then fold it back towards the left and then back to the right so it makes a short backwards "Z" shape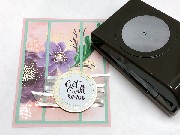 8. Punch and Layer
Punch Gold Foil Sheet with the 2" Circle Punch. Layer stamped greeting circle onto the gold circle. Add the layers over the ribbon with Stampin' Dimensionals.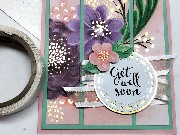 9. Add Die-Cuts
Add the die cut flower and leaves from the Gorgeous Posies kit to the top left of the greeting with Stampin' Dimensionals and Glue Dots.SUPPLIES


Current Host Code
YBTKQ4KZ
CLICK TO SHOP WITH HC
See here how to use a Host CodeCLICK TO SHOP WITH HC


Free Newsletter!

Paper Pumpkin
SIGN ME UP!

Share With Friends
Most Recent Blog Posts
- FREE SHIPPING - DEC 14
- FREE SHIPPING from Oct 9th to 11th
- Stamp another Stack of Christmas Cards with Kevin & Christine
- Let the fun begin - again …
- Why wait? Join us now!
- Fitting Florets for any Occasion
- Festive Window Wishes
- Starter Kit + = No brainer!
- Perched in a Tree
- Awash in Beauty, so gorgeous!

.jpg)
.jpg)
.jpg)
.jpg)
.jpg)
.jpg)
.jpg)
.jpg)
.jpg)
.jpg)
.jpg)
.jpg)
.jpg)
.jpg)
.jpg)
.jpg)
.jpg)
.jpg)
.jpg)
.jpg)
.jpg)
.jpg)
.jpg)
.jpg)
.jpg)
.jpg)
.jpg)
.jpg)
.jpg)
.jpg)
.jpg)
.jpg)
.jpg)
.jpg)
.jpg)
.jpg)
.jpg)
.jpg)
.jpg)
.jpg)
.jpg)
.jpg)
.jpg)
.jpg)
.jpg)
.jpg)
.jpg)
.jpg)
.jpg)
.jpg)
.jpg)
.jpg)
.jpg)
.jpg)
.jpg)
.jpg)
.jpg)
.jpg)
.jpg)
.jpg)
.jpg)
.jpg)
.jpg)
.jpg)
.jpg)
.jpg)
.jpg)
.jpg)
.jpg)
.jpg)
.jpg)
.jpg)
.jpg)
.jpg)
.jpg)
.jpg)
.jpg)
.jpg)
.jpg)
.jpg)
.jpg)
.jpg)
.jpg)
.jpg)
.jpg)
.jpg)
.jpg)
.jpg)
.jpg)
.jpg)
.jpg)
.jpg)
.jpg)
.jpg)
.jpg)
.jpg)
.jpg)
.jpg)
.jpg)
.jpg)
.jpg)
.jpg)
.jpg)
.jpg)
.jpg)
.jpg)
.jpg)
.jpg)
.jpg)
.jpg)
.jpg)
.jpg)
.jpg)
.jpg)
.jpg)
.jpg)
.jpg)
.jpg)
.jpg)
.jpg)
.jpg)
.jpg)
.jpg)
.jpg)
.jpg)
.jpg)
.jpg)
.jpg)
.jpg)
.jpg)
.jpg)
.jpg)
.jpg)
.jpg)
.jpg)
.jpg)
.jpg)
.jpg)
.jpg)
.jpg)
.jpg)
.jpg)
.jpg)
.jpg)
.jpg)
.jpg)
.jpg)
.jpg)
.jpg)
.jpg)
.jpg)
.jpg)
.jpg)
.jpg)
.jpg)
.jpg)
.jpg)
.jpg)
.jpg)
.jpg)
.jpg)
.jpg)
.jpg)
.jpg)
.jpg)
.jpg)
.jpg)
.jpg)
.jpg)
.jpg)
.jpg)
.jpg)
.jpg)
.jpg)
.jpg)
.jpg)
.jpg)
.jpg)
.jpg)
.jpg)
.jpg)
.jpg)
.jpg)
.jpg)
.jpg)
.jpg)
.jpg)
.jpg)
.jpg)
.jpg)
.jpg)
.jpg)
.jpg)
.jpg)
.jpg)
.jpg)
.jpg)
.jpg)
.jpg)
.jpg)
.jpg)
.jpg)
.jpg)
.jpg)
.jpg)
.jpg)
.jpg)